
Kitchen cabinet factory-finish respray in Oakville
A full kitchen cabinet respray to match a factory-smooth finish while keeping stains, grain and wear out for years.
What we walked into
This was a two-storey home in Oakville with a well-used kitchen. The homeowner wanted to avoid a replacement but needed a factory-smooth finish that would hold up to daily use. Work had to fit between holiday plans and the Oakville winter season.
Cabinet condition and construction
Doors were mostly MDF with some original solid-wood frames and full-overlay hinges. Surfaces had old polyurethane and tannin bleed in a few places — we treated each substrate differently rather than using one blanket approach.
Access, layout and constraints
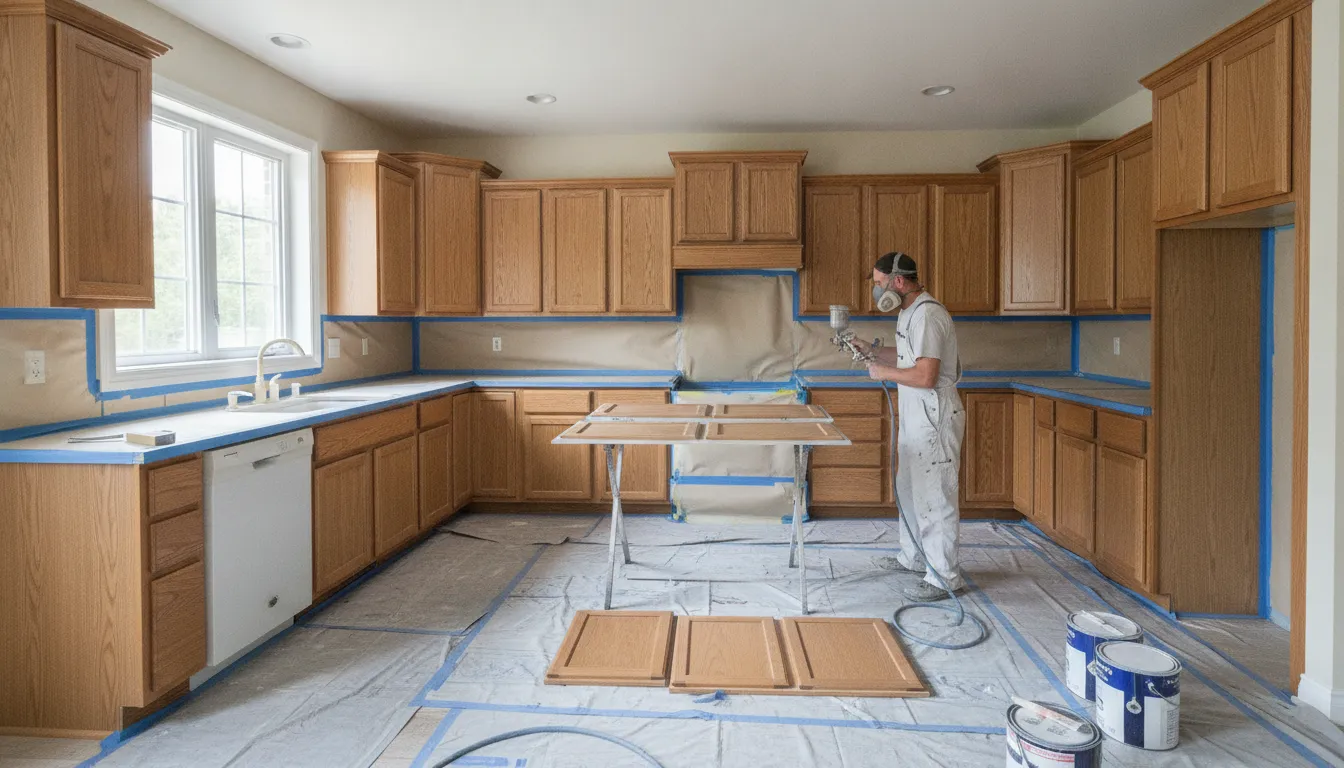
This kitchen is open to the dining area and main floor traffic, so we staged containment and worked with the homeowners to schedule sections at a time. There was no full garage or detached workshop on site, so all work used portable spray rigs and a temporary spray tent in the dining room.
Homeowner goals and expectations
They wanted a true factory look: zero orange peel, uniform sheen, and colours matched to a laminate sample. They also wanted durable results for a busy family — we were clear about trade-offs between sheen, touch-upability and longevity.
How we did it
- 1
Step 1 — Disassembly and labelling
We removed all doors, drawers and hardware and labelled each piece with a permanent system so everything went back exactly where it belonged. Hinges and soft-close mechanisms were bagged and catalogued; damaged screws were replaced with stainless hardware where needed.
- 2
Step 2 — Substrate prep by material
MDF panels were sanded to 320 grit and wiped with low-lint cloths and T.S.P.-free cleaner to remove oils. Solid-wood frames got stain block primer (Zinsser BIN or equivalent) in areas with tannin bleed; previously finished surfaces received light scuff-sanding with a maroon abrasive pad and a solvent wipe.
- 3
Step 3 — Spraying in a temporary booth
We set up a pop-up spray tent with 6-mil poly and air filtration in the dining area and used a high-volume low-pressure (HVLP) turbine sprayer for atomization control. We applied a two-coat base with waterborne acrylic primer/sealer, followed by two thin, cross-lapped coats of factory-grade waterborne acrylic lacquer for the smooth, hard finish the client wanted.
- 4
Step 4 — Sanding and polishing between coats
Between coats we wet-sanded with 600–800 grit paper and tack-removed dust to eliminate orange peel. Final coat was allowed to flash, then leveled and buffed lightly to a consistent sheen using a fine abrasive pad and a low-speed polisher.
- 5
Step 5 — Reassembly and quality checks
We re-hung every door and adjusted gaps and hinge tension to manufacturer tolerances. Final inspection included adhesion testing at hidden edges, function checks on drawers and a written care sheet for the family.
What came out of the job
The cabinets left with a true factory finish and practical durability for a family kitchen in Oakville. We balanced what would look perfect against what would hold up to kids, steam and regular cleaning.
Appearance and performance
The waterborne lacquer produced a uniform, low-reflective sheen with no orange peel. Surfaces resist water spotting and are easier to clean than the old polyurethane finish while remaining repairable for future touch-ups.
Durability and maintenance
Using stain-blocking primer on tannin-prone areas and multiple thin coats reduced chance of future bleed-through. We left the homeowner with a care guide: gentle cleaners, avoid abrasive pads, and recommended touch-up procedures for chips.
Documentation and guarantee
We documented the materials and batch numbers used and provided photos of each door before and after. The project came with a workmanship assurance and a practical maintenance plan rather than inflated warranty claims.
Questions people ask about cabinet resprays
How long does a project like this take?
Typical timeline is four to seven business days for a standard kitchen when done on site — more if there are lots of custom mouldings or repairs. We factor in drying time between coats, especially in cooler Oakville weather.
How disruptive is the work to daily life?
We work in stages, so homeowners can use parts of the kitchen while doors and drawers are away. We run portable air filtration and contain overspray; everything is email-scheduled and we leave common areas tidy each night.
When should you choose a respray over full replacement?
Choose respray when cabinet boxes are structurally sound and you want a different colour or finish without new layout. If doors are warped, boxes water-damaged or hinge locations badly altered, replacement may be a better long-term choice.
Are there seasonal considerations in Oakville?
Yes. Oakville sits in the America/Toronto timezone and seasonal humidity can slow cure time — we avoid spraying in high-humidity days and plan around cold snaps. That keeps finish quality consistent and prevents tacky surfaces.